I recently caught up with the team at Fotospeed to produce this video on landscape photography in Winter. During the chat we spoke about various topics including; tips for on location shooting, gear selection, post-processing and print preparation and paper choice. Check out the video below and read on to get some more of my thoughts…
Equipment
It all starts with knowing your equipment and being safe and comfortable. If you’re too cold you won’t be enjoying yourself and if your fingers are freezing it’s impossible to take any photos anyway! So, it goes without saying wherever you are it’s important to dress appropriately and make sure you put safety first. As a minimum you need:
A good warm coat & hat to retain your body heat
Gloves which give enough warmth but aren’t too bulky to operate the camera
Decent walking shoes (potentially with snow spike additions)
Lots of spare batteries!
Shooting Tips
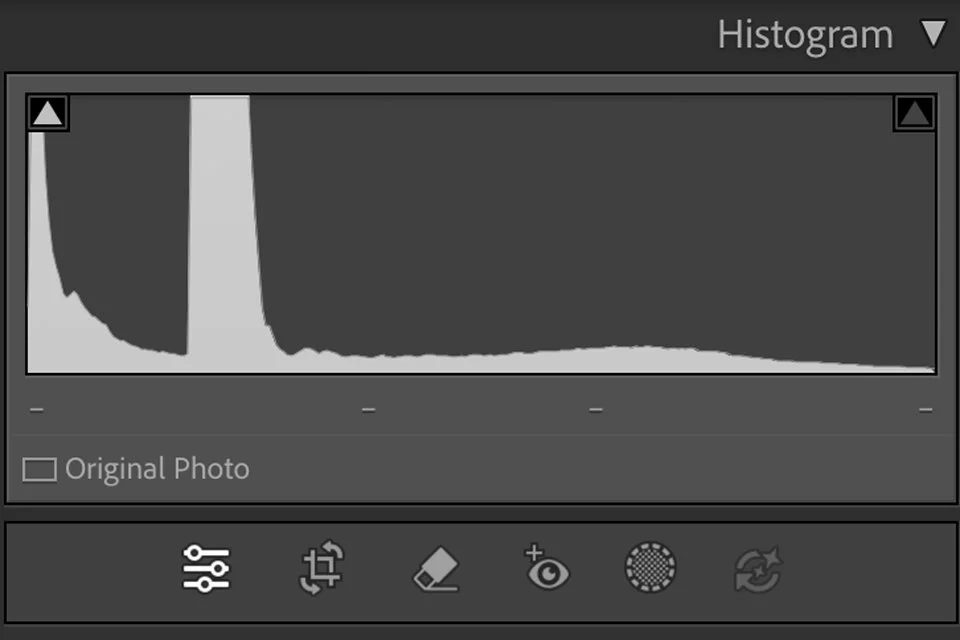
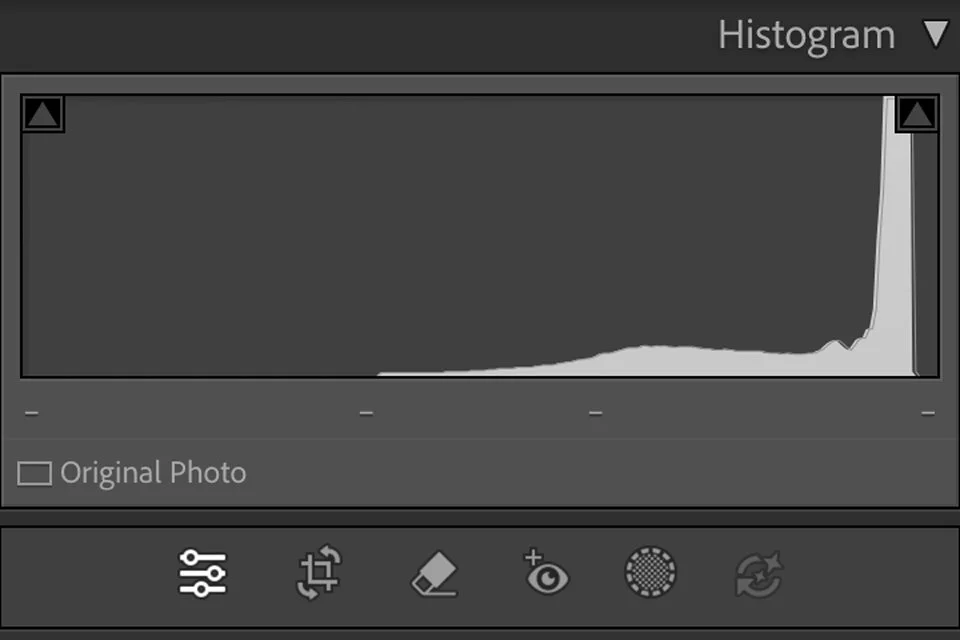
It’s easy to think that if you’re shooting RAW then it’s not critical to get all your settings bang on in the field. However, I would argue that the better the ‘data’ you get in the field, the better the final image & print can be. For example, making sure you expose to the right of the histogram (whilst avoiding any highlight clipping) will give you the largest file with the most information. If you leave the camera to automatically give the exposure value with snow it will always shoot it at least 1 stop too dark as it tries to average it out to a mid-grey.
So, keep your eye on the histogram, and use either exposure compensation or manual controls to push the highlight data as far to the right as you can whilst avoiding any clipping and loss of data. Don’t forget; the histogram on the back of your camera usually relates to the JPEG preview NOT the full RAW file. As such you can afford to push the highlight data up as far as possible to make sure that the snow is nice and bright.
You can see two examples of Histograms below, the one on the left for a darker image (see below), and the one on the right for a lighter image (also below). You can also see on the left Histogram an area of dark shadow/black is ‘clipping’ but that’s not something to worry about in my opinion.


I do use some of the film simulations on the EVF/screen, especially when shooting black & white. Seeing these options in the field can help you follow an aesthetic idea, and don’t forget because these only affect the JPEG preview you’ll always have all the data still in the RAW file.
Always shoot RAW but do use the JPEG film simulation/picture modes to give some inspiration
Use the ETTR motto (Expose To The Right) to get the most data, but avoid clipping highlights
Use the histogram and expose manually or with exposure adjustment dialled in
Don’t forget the histogram refers to your JPEG preview, not the RAW file so you have some more flex if required
WHAT ABOUT COLOUR?
I am a self-confessed black & white addict(!) but shooting in colour during the Winter is also a great thing to do. However, you have to be extra careful with your white balance and all the exposure tips as described. In the video above we do feature a couple of colour images including this ice ‘wave’ below. It was shot in a stream, later in the afternoon on a very cold day. As such, there was quite a blue hue in the shadows and indeed in the ice. Balancing this natural blue with a pure, natural ice colour was the goal in the post-processing.

PRINTING TIPS & PAPER CHOICE
In terms of what paper suits these types of images; my go-to for 95% of winter/snow/ice related images is the Fotospeed NST Bright White 315 paper. It has a very high white point and a bright white base to make that snow & ice ‘pop’ off the page. This paper also features a very gentle texture, in my opinion it gives just enough without getting in the way of the image. The NST Bright White paper is very versatile and I find it makes both black & white and colour winter images really stand out.
Alternatives could be the Platinum Baryta, especially for high contrast black & white snowy images, or perhaps the Fotospeed Platinum Cotton 305 which is a little warmer but with a really excellent surface micro-texture. If in doubt I’d suggest you buy one of the Fotospeed Test Packs where you get a variety of papers and you can try them out for yourself.
IN summary
You don’t have to be travelling to far-flung corners of the globe to capture great winter images. Although I’ve focussed a lot on snow & ice in the images above, it’s worth considering all other types of winter related imagery you could explore. The low angled raking light we get here in the UK can be stunning when it sculpts our rolling hills. You may also find early morning frosts or bare branches might be your thing, whatever it is I’d encourage you to go out and shoot as much as possible this Winter!
Happy photographing,
Sam